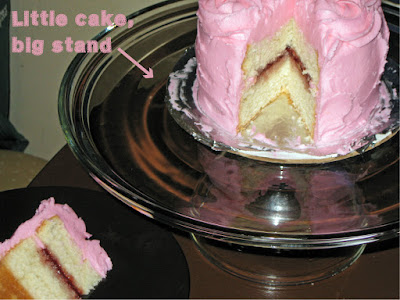
I make a lot of tiny cakes. There's only two people in my household and making a large one would be excessive. So that's just fine and dandy but something that's been starting to get to me is the fact that these little cakes look so silly on my nice cake stand.
See what I mean? Not so majestic sitting up there. It's like wearing clothes that are too big, it's not flattering in the slightest.
The thing is, though, that I'd never had a real reason other than vanity to have a little cake stand. The large one does a fine job of displaying my cakes and there was no need for anything more.
That time has come.
In planning to host these seven people at my humble abode for a couple of meals I also planned to bake a cake! What kind of host would I be if I didn't? One that didn't serve cake, obviously.
So wouldn't one full sized cake be more than enough? Normally, this would be true, but one of my guests has some allergies and she'll be getting her very own tiny gluten and dairy free cake!
Now that the big stand will be host to a butter and wheat flour cake I'm going to need something else to display the tiny one.
I know that there are many do-it-yourself cake stands out there, but this is a first for me.
For this project I gathered
- A dry erase marker
- Small glass dish
- Small glass cup-thing
- Adhesive
- Q-tip, one cotton end cut off
- Ruler
This is a great project, and super cheap. The glassware cost me $1.50 at the thrift stores. Clean it up and it's perfect!
The first step was to find the radius of both circles. I subtracted the smaller radius from the larger and measure this distance from the outside of the plate in. This spot was marked and I continued around the circumference of the plate marking these locations with the dry erase marker. Oh, and mark on the top of the plate, even though we'll be gluing to the bottom. This will allow for those marks to actually be erased.
Looking at this picture, it doesn't look very centered. I assure you it is, I just took the picture at an angle. Put the adhesive on both pieces and smear evenly with the un-cotton side of the Q-tip.
My adhesive wants the glue to dry for 10 minutes before the pieces are glued together, but follow the instructions on whatever adhesives you use. Once glued together, I stacked some heavy books on there and left it there for a few hours.
Ta-da! Mini cake stand. Perfect for all those mini cakes, including one I'll talk about in my next post.
It fits right in the palm of my hand; cute!
Expect to see a lot of cakes in the next few weeks as I learn a little more about decorating and hopefully there will also be a few changes to the site pretty soon. Keep an eye out!
xoxo
Stephanie


This comment has been removed by the author.
ReplyDelete