25 August 2011

Polka Dot Dress Part Two: The Bodice

That title is pretty self-explanatory, but for those not in the know I've been working on a dress. It's a long process for me, but I'm taking my time so there are less mistakes. That's the plan anyway.

So far I just have the bodice done and, if I may say so myself, it's starting to look like something!


Going slowly is working out for me so far because I've only made one mistake and it was an easy fix. I got mixed up with the strap placement at first and could have had a problem when it was time to wear it. Thankfully I hadn't actually sewn it on yet when I realized what happened.

I just love the polka dots. Check out the cute fabric I found for the lining, too!


I originally was going to have a plain pink or purple lining but I couldn't pass up this precious floral pattern. Especially at $1.50 a yard; Wal-Mart is not my favorite place to buy anything but what a deal!

I can't wait to start work on the skirt soon. It has pockets. Pockets!

xoxo
Stephanie

20 August 2011

Grandma's Apples Pie

Yesterday myself, my husband and baby visited my grandparents, like we do nearly every week. During this visit they offered us some of their newly-ripened apples for us to pick and take home. My husband being 6’2” tall was the one who was chosen to procure the fruit from the higher branches. It was generous of them…and seeing the apples hanging off the tree all ripe and tasty made me envision a flaky, tender and sweet destiny for them! 
Aren’t they a thing of beauty? Just the thing to welcome the coming early autumn season. After doing some research once we had brought the apples home, I discovered the apples were Alkemene and Golden Delicious which were perfect for pie since they are tart and firm! I’d been looking for an opportunity to make a pie ever since my husband bought me that great cookbook I shared with you in April.

So today I got to work making my pie. I’ve made pies before (cherry, which is my favorite), but almost forgot how incredibly fun it was! Especially fun was pinching the butter into the flour and salt mixture.
Few things feel better in the kitchen to me than that old-fashioned hands-on approach (I’m a firm believer that if you don’t make even a little mess on your hands and in the kitchen, you’re not enjoying yourself!) This is cultured butter, too, by the way. Interesting note: The traditional way to make that pie crust flaky is to use cultured butter, because its acidity is what breaks down the gluten in the flour.

Once the dough-making process was complete, with two balls of dough chilling in the refrigerator, each one of the star attractions of this pie was tenderly washed, delicately de-leaved, and carefully peeled…
 and keenly chopped…
I tossed the pieces together with sugar, flour, and cinnamon! While that perfect unity of ingredients sat together stewing happily in a big bowl, I shaped my pie crust, rolling it out into big circles (with a bit of hand patting for good measure, and a good deal of mess!)
Once the first circle of crust was place in the pie pan, it was time to bring it all together!
Mmm…apple pie. The top crust was put on, of course, and into the oven it went! What came out was what looked like pie perfection (really, please click ALL the following pictures to enlarge to see the full flaky detail!):

Well, my husband couldn’t wait much longer than I could to cut a few early-morning slices, but not before throwing on some powdered sugar for good measure. Once sliced and plated, I knew that I had achieved my best pie to date.
The flaky golden crust, the juicy spiced apples that retained their crisp texture just enough to still melt in your mouth. No lie, when I tasted this pie, I declared with no small amount of pride and quite loudly “This is the best pie I have ever eaten!”

No, you won’t find the recipe for this pie here. Why? Because I want you all go out and buy the amazing book The Lost Art of Real Cooking, by Rosanna Nafzinger and Ken Albala. Go and get it right now! For this is one delicious and surprisingly simple pie…baking recipes these days seem so scientific and standardized and complicated and statistical, but this book brings it all back to the poetic basics. Follow the recipe, but make this recipe your own…they encourage it in the book. I myself added extra butter and a splash of vanilla in the crust, and used confectioner’s sugar, and adjusted the baking time.
Whatever you do, write down your alterations, and enjoy your pie! It will be scrumptious

18 August 2011

T-Shirt Resize

I love t-shirts. They're comfortable, versatile, and it's hard to look bad in one. Over time I've ended up with a few over sized shirts and, being on the petite side of the spectrum, it's hard to make something that's just too big look flattering. It's a shame because I had a few perfectly good shirts that were not getting worn. So here's a project I've been going crazy with.

Over sized no more! I'm sure there's tutorials all over the web for this but here's what I did.

Here's one of the shirts in question:


I am super fancy. This t-shirt is super awesome because I friend of mine picked it up for me at Comic-Con one year (and scored me some original art) and I love it it pieces. As you can see, it's not exactly a great fit. I fixed that.

The first step is to gather up this shirt and another that actually fits. I chose a shirt that fit but was a little loose because if I chose something more form fitting I'd cut off some of the design of the blue shirt. If you have a design on your shirt, check measurements for that before you do anything drastic.
You will also need a marking pen or chalk and fabric scissors.


Fold both shirts in half and place the smaller shirt on top of the large shirt and tuck in the sleeves. Then trace around the smaller shirt, leaving a distance for a seam allowance.

Cut along your line. Next, trace out your new sleeve size by placing the new cut out on top the sleeves. Trace and cut. These sleeves didn't need much resizing, but every shirt is different. 

Turn each piece, body and two sleeves, inside out with right sides facing each other. Sew along the body sides (do not sew the armholes!) and the sleeve bottoms according to your earlier seam allowance. I'll note that the sleeves, while not traced with a seam allowance they should be sewn the same as the body of the shirt. The picture is blurry, but hopefully it shows what I mean.


Time to attach sleeves. Place the sleeves inside the armholes, right sides together with seams matching. Sew together.


Press your seams and turn the shirt right side out. You're done! Whoo! Time for the t-shirt dance!


Okay, I'm not dancing in that picture. Somebody was supposed to help me take pictures and instead I was left to take them myself in the mirror. The one that turned out the best I just happened to be holding the camera over my head. Good times.
Here are some others I've done:

 I do like me some bright colors. To put in perspective how long I've held onto some of these shirts that pink one is a band t-shirt for a garage band from high school. Junior year. Yeah, that's right. Seven-ish years I've held onto it because I love pink and I knew I'd wear it one day.
The Godfather one is awesome because it is extra long and would probably look pretty cool with some skinny jeans or leggings.

xoxo
Stephanie

16 August 2011

First Time Fondant


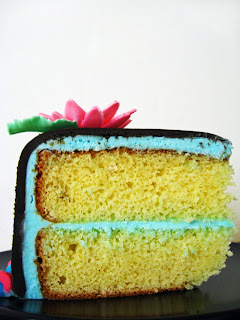
Oh fondant. I already have a love/hate relationship with it. It makes a cake look so pretty but it tastes so awful. Those lovely gum paste daisies aren't so delicious, either.

This was the first full fondant cake I've ever made. It was for my cake decorating classes that I was taking the last few months. There were a couple of things I learned.


The first thing I discovered was that tinting your gum paste with fondant will drastically lighten the color. This really should not come as any surprise as that, like with paint, white + regular color = pastel color. I chose daisies in particular because they're kind of special to me. I also ran out of time to make the chrysanthemums and daisies are easy. They were supposed to be the same neon teal (my camera made them blue) and pink as the rope border.  Oh well, they were still cheery! 

Speaking of that rope border...


While not as bad as I was rolling clay in grade school, my rolling could use improvement. Thin areas here, thicker there. Note to self: work on that.


Those flowers look a little messy. Had this not been for a class and thus classified as "practice" I assure you they would have been cleaned up once the gum paste was dry. I rolled it out a little too thick I think and that may have caused the problem. The leaves turned out surprisingly clean and that could be because I rolled the green a lot thinner.


Biggest lesson: black is hard to make. Yes, I wanted a black cake because it would really make the bright colors pop! Plus, a black, pink, and teal cake is very Stephanie. I used a chocolate fondant as a base and after adding what seemed like way too much black gel icing color I stopped at the color you see there. The colors still popped but it wasn't as dramatic as I had envisioned. It is my goal to one day achieve true black.


Confession time: I used a box cake. When I made this cake I had less than a week before I moved and a lot of my good stuff was packed.  It was still enjoyable and it served it's purpose as a way to display butter cream and fondant.


This cake concluded my cake decorating courses. Hopefully I'll be getting more practice in and out of school this coming year. I'm already planning my next cake and it will certainly have fondant. I bought some fun silicone molds and I can't wait to play around with them. My plan for next time is to make my own fondant from marshmallows. I did that once before and the taste is so much more pleasant than anything store bought that I've tried.

xoxo
Stephanie

11 August 2011

Polka Dot Dress Part One: The Pattern

I'm just going to come right out and say it: I am not good with sewing patterns.

Once, way back in high school, I wanted to sew a corset. Nothing fancy or anything that cinched up like a real corset, just one of those tops that looks like one. I thought "that should be easy." Never mind that I'd never sewn much of anything in my life, that is what I wanted to do! I found a pattern, got some fabric and gave it my all! It was wearable.... once... but not super comfortable. Looking back, I should have started with something easier. Since then, I've had my mother help me with Halloween costumes. No joke.

Most of my sewing, as I've shown here, is re-fashion. The only thing I've made thus far from a pattern that I actually like is an apron. A full sized pink and black plaid apron. I love it to pieces and I should have blogged it. I didn't because I got over excited and forgot to take any pictures. It may turn up in one of my baking posts one day because I do wear it all the time.

Whoops. Digressing there. Patterns intimidate me a bit. Will I ever make something as cute as what's in the picture? Aprons are easy, corsets are do-able, but a dress? Well, I've decided to go for it.


Look! It's even marked "easy" for me. It's like they know...
I bought this pattern for $0.99 when Jo-Ann's was having a sale. No $20 patterns for me, no way. I didn't actually have any fabric when I bought this, nor did I buy some during the sale. Nothing spoke to me that day. I knew the fabric would come when it was ready.

 
About two weeks later, it did. I was visiting one of my favorite thrift stores (now that I've moved, I need to find some new ones!) and I found the most adorable pink & purple polka dotted sheets. Yes, sheets. I can't remember the exact amount, but I don't think they were more than $2 or $3. It was just too cute and there was certainly enough for a dress.  Like the dress made of curtains in "Enchanted." Except I won't be as regal.

As always with thrift store finds, I ran the fabric through the washing machine and ironed it all out. I've decided to go with pattern "C." That's the red one in the picture if you can't read the label. I think it will look precious with polka-dots.


That's another first up in the top right corner. Fusible interfacing. This pattern is getting intense! This is what I have so far. I've only cut out the main pieces of fabric. I still need to cut out the lining pieces and the interfacing pieces. Once that's done I can start the actual sewing process.


I'm pretty excited about starting this project. If it all works out I'll have actually made something wearable from scratch! I know plenty of people do it all the time, but the only things I make from scratch are edible and don't last long.
I'm older and more patient than I was in high school, so hopefully I'll come out with a dress at the end of this.

Wish me luck!

xoxo
Stephanie

09 August 2011

Blueberry Tree Cake


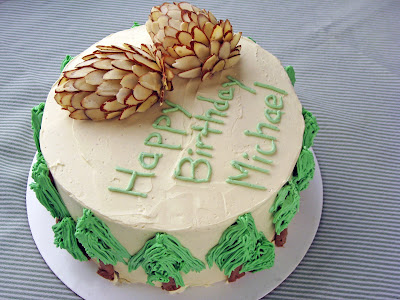
Hey. This cake looks familiar. A month and a half later, my life is out of moving boxes and it's time to show the world. Here is is: the blueberry tree cake. Complete with pine cones.


Blueberry seems like a funny cake flavor, doesn't it? That's what I thought too when my wonderful boyfriend said that's what he wanted for his birthday. The conversation went something like this:
Me: "What kind of cake would you like for your birthday? I'll make anything you want!"
Michael: "Hmm.... blueberry. With trees on it."

That, ladies and gentlemen, was what I had to work with. So I started brainstorming. How could I make a blueberry cake? It was during this brainstorm session that I remembered the strawberry cupcakes I had made last Valentine's day. Those were delicious! In theory I could easily swap the strawberries for blueberries and it would work. I was very confident about this.


Tell you what, it worked. Peek underneath the cut to see how I did it.