27 June 2011

A Hand-made Cardigan Sweater for my Baby!

It's finished! 
Looking back to when I first began this project, I felt that knitting a sweater, even a little one for a baby, was going to take a long time. Despite the intermittent ‘click-click’ of the needles as I snuck in a few stitches whenever I could throughout my busy days, completing this special project really only took me a month and a half to complete….the first of many things I will create for my baby boy (I hope!).

So, since my last update, I did quite a bit: I finished the two sides, the all-important sleeves, and of course sewed it all up. I confess that I would have finished sooner, but I read the directions wrong and had to pull out half of a sleeve to do it all over again! (Hey, it happens; all part of the knitting process, you know).

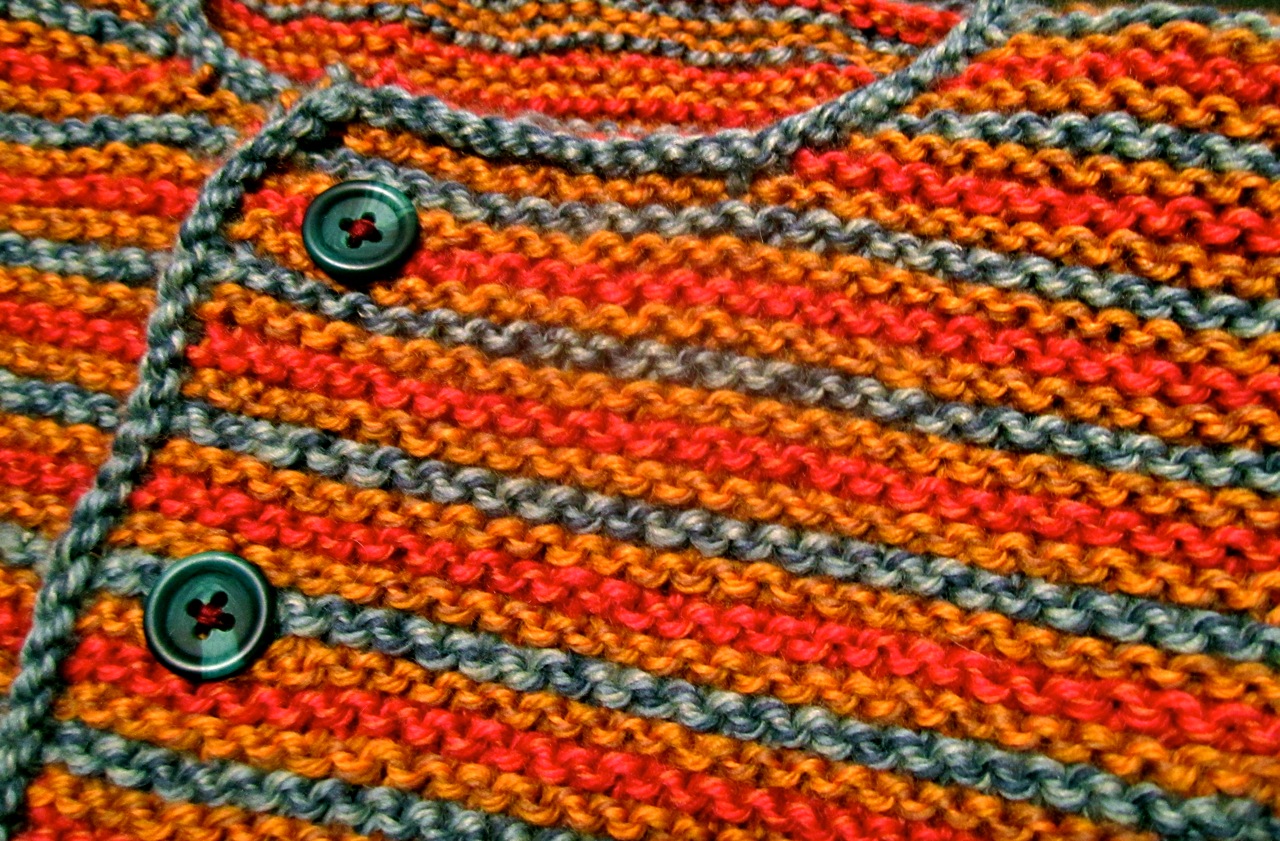
One sleeve ended up a slightly crooked once sewn on to the sweater body, but that is what blocking is for! Blocking is easy, but it makes the sweater smell like a wet dog for the night while it dries, yet it essentially straightens out the relative form of the garment. After it was blocked and dried, my husband with his wonderful eye found these fantastic blue buttons that seemed like there were made for this sweater.
I opted to hand-stitch the buttons on, to add that last little ‘made by hand’ touch.

So there you have it. My baby’s first cardigan, made lovingly by hand by mummy! Here in the beginning of summer it’s too big (and too warm) to wear now, but rest assured that as the cool late autumn comes around he will be ready for it and there will be lots of pictures to share when this sweater is put on for the first time!

Thanks again to Stephanie for finding this yarn for me, and thanks as well to me for being awesome enough to want to do this it through to the end!

23 June 2011

Pretty Peach Roses


I'm a little bummed. I went to my decorating class this last Tuesday night and made so many different flowers: daffodils, violets, lilies, and roses. The daffodils and lilies I was especially excited about because I just love those flowers. Lilies in particular are my favorite.

The flowers... didn't quite make it through the drive home.

Really, this is okay in the big picture. I wasn't going to use them for anything. I just wanted to share them on the blog and now I can't.

Instead, I have these cupcakes that I was going to post about along with the ill-fated flowers. I  made these a couple of weeks ago (see how behind I am on blogging?) and they were my very first attempt at making roses.


I felt pretty good about them, being my first try and all. The Wilton method has you do them in layers of 3-5-7, but sometimes I forgot to count so I ended up with extra petals on some of these. It just makes for fuller roses!
Roses are so simple to make. They always looks so lovely and, with practice, I think that anyone can do it.


These pictures don't do the blue roses any justice. In real life they were a wonderful and quirky aqua color. I mixed leaf green and sky blue and the result was just beautiful. For the peach I mixed rose pink and lemon yellow. I had never tried either combination before. I was pleased as punch.


The cupcakes themselves were a delicious, moist chocolate. I didn't bake from scratch, I used a box mix. To spice it up a little bit I used the same method I used for this bundt cake; although I didn't have enough Bailey's to make them Irish cream-chocolate. I'm sure that would have been tasty. Instead I used what I had and used replaced the rest of the liquid with water. The Bailey's was just enough to make the cakes super moist.

The frosting was a simple powdered sugar buttercream. I added vanilla bean paste instead of vanilla extract and oh. my. goodness. It makes such a difference.

I have a big cake project coming up in the next few days that I'm excited about and I can't wait to share it!

xoxo
Stephanie

17 June 2011

Buttercream, Royal Icing, and Gum Paste, Oh My!

It has been awhile since I've talked about my cake decorating classes. I'd like to first apologize for that; life has been a wee bit insane lately. So much to do and so little time to do it.

The second class of three is flower decorating. I am thoroughly enjoying this class. The first lesson we got a little taste of fondant and gum paste, but we'll be using much more of that in the third class. Right now we're working with royal icing, which is super easy to work with and dries hard. This allows for the flowers to keep their shape. Examples of both this and the gum paste are at the end of this post.  

Moving right along... I finished up the last of the beginning class a few weeks ago with this cake:


Before anyone thinks I was being snarky with the "Eat Me" written on there, it's actually an "Alice in Wonderland" reference. I just adore those books and when given the assignment to write something on there I couldn't help myself.

Also, please ignore the not-so-great photos. I was having one of those days if you know what I mean.

The cake itself was a lavender flavor, with lemon curd filling and lavender frosting. It was good, but not great. Lavender is hard to work with I've found. Not enough means you can't taste it but too much makes it soapy. Yuk.


So those ribbon roses up there aren't so great for two reasons. The first is that my frosting was a little dry; oops. The second was that my instructor admitted that they never, ever look as nice as the photoshopped ones in the book.


You see, the roses are supposed to look, as the name suggests, like they are made from ribbon. Well, when using the #104 tip the edges come out ruffled. That's great for real looking roses (coming up in my next post) but makes it impossible for these ones to look smooth. One of my classmates put a little piping gel into her buttercream and that helped smooth out the petals a bit so if I ever want to make these again, I'll try that.


Hmm... no idea what I did to that leaf, there. My poor, lovely leaf.
Just for fun, this is what the cake looked like inside. It wasn't as moist as I usually like my cakes, but it was still pretty good. Like with those lemon cupcakes, the lemon curd may have been one of my favorite parts.


The first lesson in the second class introduced us students to gum paste and fondant. It doesn't taste great, but it's really enjoyable to work with. Check out these gum paste flowers we all made.


Precious, right? The first flowers, the button flowers, were made by sticking the gum paste (colored with fondant) into a mold that we pressed together to cut out the shapes. You can see the little raged-edges on some of the petals. That can be cleaned up once the gum paste is fully dry.

Also, you can see that I didn't quite press hard enough on the large purple flower. It was my first time and I didn't realize how much pressure you really have to put into that mold.
Next were the pansies. I felt pretty good about these. They're rolled out really thin, cut out with a cookie cutter, then placed on foam. When on the foam we used this little ball-roller to give the edges that wave.


Lastly, the second lesson of this class was our first introduction to royal icing. Well, I'd worked with it the weekend before when I tried out real roses on some cupcakes, but I'll show you all those later. As far as classwork goes, it was the first time using royal icing.
I did a better job with the flowers at home.

When I got to class it was discovered that my icing was a little on the runny side. I made some apple-blossoms and primroses with it anyway. I had the motion down but they were not exactly pretty enough to take pictures of. Sorry.
I did take pictures of my rosebuds! I finally had to borrow some powdered sugar from a classmate to thicken up the icing.


These are the oddest little things. They really don't look like much of anything until you add the greenery (see what I was talking about? Runny icing for those.) Until you add that they just look like lumps. I've seen them look beautiful so I'm going to keep working on them.

xoxo
Stephanie

12 June 2011

Sweet Nostalgia

I found the very best thing ever when at the used bookstore the other day and I just had to share.


What I have here is a little piece of my childhood. This book is the same one my mom had when I was a kid. At a bargain price of $4.00, I can relive some of my favorite recipes. Also, I won't have to ask my mother to e-mail me the sugar cookie recipe anymore.


This is a treasure of the early 90's. Just look at the shining face in that picture. I know cookies make me smile like that. What I really like about this book is that every recipe is straight-forward and simple. If I could do these as a kid you bet I can do them now even better. Something fun I like is that there's always a picture to reference. I'm not saying every cook/baking book needs pictures, but when trying new things I'm grateful when my cookies look like the ones in the book. Otherwise I'm just guessing.

   
Look at these adorable chapters! There's even a few cake and pie recipes in there, too. Everything looks so delicious I can't really decide where to start. Any suggestions for me? Those bar cookies are looking pretty scrumptious, but so are all the others.

Oh, and speaking of adorable and delicious: take a look at my new cake server.


Cupcakes! Isn't this darling? I received it as a gift and I adore it. It's the cutest piece of kitchenware that I own, that's for sure.


I can't decide if the cupcake wearing a crown is my favorite, or if it's the one with the party hat. It's too difficult to make that choice.

xoxo
Stephanie

08 June 2011

Yo-Yo T-Shirt


Awhile back a friend gifted me with a few articles of clothing that she no longer needed and/or no longer fit. This shirt was one of them. I love the soft grey color, but the sleeves were always a little loose down by my wrists. When I wore the shirt I usually rolled up the sleeves to my elbows. Then I had a thought about the last t-shirt reconstruction I did. If I could cut the sleeves off that shirt, why not this one?

So I did.


07 June 2011

Chocolate-Dipped Coconut Macaroons


These. Are. So. Good.

These cookie were an unexpected treat I made last week (yes, I'm behind on my blogging. Expect a lot of posts this week as I play catch up) due to the fact that I had shredded coconut in my house and I never have shredded coconut in my house. I'm thinking of making it a staple from now on.

If you like macaroons, I promise these are amazing. They may also be one of the the easiest cookies I've ever made. There are only four ingredients!
  • 3 large egg whites
  • 1/2 cup sugar
  • 1/4 tsp. salt
  • 1 14 oz. package of sweetened flaked coconut


Looking at that picture you may be thinking "Hey. That doesn't look like a full package of coconut." It isn't, but there was still enough to make the cookies.
See, I had made some granola early in the week that needed just a little coconut and I had most of the bag left over to do something with. In case you're wondering, the granola needs work but it was edible.
The first step is to preheat the oven to 350 degrees and line baking sheets with parchment paper. Then, in a large bowl whisk together the egg whites, sugar, and salt until frothy.

Yum. With a fork, or spatula like I used, mix in the coconut nut until moistened.

Pack the mixture into level, tablespoon amounts and drop onto baking sheet. Bake until golden, about 25-30 minutes. I checked mine at 20 minutes and they were perfect. Know your oven.
Once they were cooled I made up some ganache; because I had some cream I wanted to use up and chocolate-dipped macaroons sounded amazing. Ganache is also ridiculously easy, but here's the recipe for anyone who would like it.
4 oz. semi-sweet chocolate, finely chopped
1/2 cup heavy cream
First, chop up that chocolate as fine as you can. This will help it to melt more evenly. Place it in a heatproof bowl. Next, bring the cream to a boil over medium heat in a saucepan. Pour the cream over the chocolate and let it sit 10 minutes. Stir the mixture gently until fully incorporated. The ganache should appear glossy.
After I made that I dipped the cookies half-way into the ganache and placed on waxed paper. I did not get any good shots of this process, but you can imagine. Then they're all done!
I took these to work and they were gone within an hour; and that was even with the cupcakes that someone else had brought in. Those were not gone in an hour, but to be fair, there were more cupcakes than cookies.
xoxo
Stephanie
*recipe from Martha Stewart. Again.

02 June 2011

My Little Terrarium


I will be the first person to say it: I am not a gardener. I leave all outdoor (oh heck, indoor too) plant life to my boyfriend. He enjoys it much more than I do and, thus, takes greater care.

Something weird happened, though. I suddenly got it into my head that I wanted to make a terrarium. The idea of planting something in a glass case sounded pretty cool and I love how they look. So I hunted around at thrift stores looking for glassware that came with a lid. The lid was important to me; it was all about my vision.

I did finally find what I was looking for... sort of. I found a long, ugly cylinder glass with a fantastic lid, so I decided to buy it anyway. I took the measurement of the opening in the cylinder glass and found a fun circular bowl that worked perfectly. 

Next part of my vision was the plant; I needed something low maintenance if  I was going to do this. Browsing through the local farmer's market one Saturday morning I found a dainty little succulent. It was beautiful.